Showing posts with label Android Basic Example. Show all posts

Friday, May 29, 2015

Custom Listview Example

Custome ListView Example output

Custom ListView Output

Project Structure
Project Structure

Step 1 :
Create a new package “model”
Under this package create a class “ListItem.class”

package com.pratik.customlistviewexample.model;

/**
 * Created by prats on 5/28/2015.
 */
public class ListItem {

    public String getCountryName() {
        return countryName;
    }

    public void setCountryName(String countryName) {
        this.countryName = countryName;
    }

    public String getCountryCurrancy() {
        return countryCurrancy;
    }

    public void setCountryCurrancy(String countryCurrancy) {
        this.countryCurrancy = countryCurrancy;
    }

    public int getCountryImage() {
        return countryImage;
    }

    public void setCountryImage(int countryImage) {
        this.countryImage = countryImage;
    }

    private String countryName;
    private String countryCurrancy;
    private int countryImage;
}


Step 2 :
Create a new package “adapter”
Under this package create a class “CustomAdapter.class”
 
package com.pratik.customlistviewexample.adapter;

import android.content.Context;
import android.view.LayoutInflater;
import android.view.View;
import android.view.ViewGroup;
import android.widget.BaseAdapter;
import android.widget.ImageView;
import android.widget.TextView;

import com.pratik.customlistviewexample.R;
import com.pratik.customlistviewexample.model.ListItem;

import java.util.ArrayList;

/**
 * Created by prats on 5/28/2015.
 */
public class CustomAdapter extends BaseAdapter {

    private Context context;
    private ArrayList<ListItem> arrayList;

    public CustomAdapter(Context context,ArrayList<ListItem> arrayList)
    {
        this.context = context;
        this.arrayList = arrayList;
    }

    @Override
    public int getCount() {
        return arrayList.size();
    }

    @Override
    public Object getItem(int position) {
        return arrayList.get(position);
    }

    @Override
    public long getItemId(int position) {
        return position;
    }

@Override
    public View getView(int position, View convertView, ViewGroup parent) {

        if (convertView == null) {
            LayoutInflater vi =
                    (LayoutInflater)context.getSystemService(Context.LAYOUT_INFLATER_SERVICE);
            convertView = vi.inflate(R.layout.custom_row, null);
        }
        final ListItem listItem = arrayList.get(position);
        if (listItem != null)
            ((TextView) convertView.findViewById(R.id.txtCountryName)).setText(listItem.getCountryName());
            ((TextView) convertView.findViewById(R.id.txtCountryCurrancy)).setText(listItem.getCountryCurrancy());
            ((ImageView) convertView.findViewById(R.id.imgCountryFlag)).setImageResource(listItem.getCountryImage());

        return convertView;
    }
}

Step 3:
Create a new layout xml file “custom_row.xml” under directory ”layout”

<?xml version="1.0" encoding="utf-8"?>
<LinearLayout xmlns:android="http://schemas.android.com/apk/res/android"
    android:layout_width="match_parent"
    android:layout_height="match_parent"
    android:orientation="vertical">

    <LinearLayout
        android:layout_width="match_parent"
        android:layout_height="wrap_content"
        android:orientation="horizontal">

        <ImageView
            android:id="@+id/imgCountryFlag"
            android:layout_width="100dp"
            android:layout_height="100dp"
            android:layout_margin="10dp" />

        <LinearLayout
            android:layout_width="wrap_content"
            android:layout_height="wrap_content"
            android:orientation="vertical"
            android:layout_gravity="center">

            <TextView
                android:id="@+id/txtCountryName"
                android:layout_width="wrap_content"
                android:layout_height="wrap_content"
                android:layout_margin="10dp" />

            <TextView
                android:id="@+id/txtCountryCurrancy"
                android:layout_width="wrap_content"
                android:layout_height="wrap_content"
                android:layout_margin="10dp"/>
        </LinearLayout>
    </LinearLayout>
</LinearLayout>

Step 4:
activity_main

<LinearLayout xmlns:android="http://schemas.android.com/apk/res/android"
    android:layout_width="match_parent"
    android:layout_height="match_parent"
    android:background="#FFFFFF">

    <ListView

        android:id="@+id/listView"
        android:layout_width="fill_parent"
        android:layout_height="wrap_content"
        android:layout_gravity="center"
        android:dividerHeight="1dp"
        android:divider="#ff305aff"/>
</LinearLayout> 


Step 4:
MainActivity.class

package com.pratik.customlistviewexample;

import android.support.v7.app.ActionBarActivity;
import android.os.Bundle;
import android.widget.ListView;

import com.pratik.customlistviewexample.adapter.CustomAdapter;
import com.pratik.customlistviewexample.model.ListItem;

import java.util.ArrayList;

public class MainActivity extends ActionBarActivity {

    private ListView listView;
    private CustomAdapter customAdapter;
    private ArrayList<ListItem> arrayList;
    private String[] countryList =new String[] {"Australia",
                                    "Brazil",
                                    "Canada",
                                    "Denmark",
                                    "Egypt",
                                    "France",
                                    "Germany",
                                    "Hong Kong",
                                    "India",
                                    "Japan"};
    private String[] countryCurrancy =new String[] {"AUD Australian dollar",
                                        "BRL Brazilian real",
                                        "CAD Canadian dollar",
                                        "DKK Danish krone",
                                        "EGP Egyptian pound",
                                        "EUR Euro",
                                        "EUR Euro",
                                        "HKD Hong Kong dollar",
                                        "INR Indian rupee",
                                        "JPY Japanese yen"};
    private int[] flags =new int[] { R.drawable.ic_australia,
                            R.drawable.ic_brazil,
                            R.drawable.ic_canada,
                            R.drawable.ic_danmark,
                            R.drawable.ic_egypt,
                            R.drawable.ic_france,
                            R.drawable.ic_germany,
                            R.drawable.ic_hong_kong,
                            R.drawable.ic_india,
                            R.drawable.ic_japan};

@Override
    protected void onCreate(Bundle savedInstanceState) {
        super.onCreate(savedInstanceState);
        setContentView(R.layout.activity_main);

        listView = (ListView) findViewById(R.id.listView);
        arrayList = new ArrayList<ListItem>();

        for (int i = 0;i <=9;i++){

            ListItem listItem = new ListItem();
            listItem.setCountryName(countryList[i]);
            listItem.setCountryCurrancy(countryCurrancy[i]);
            listItem.setCountryImage(flags[i]);

            arrayList.add(listItem);
        }
        customAdapter = new CustomAdapter(this,arrayList);
        listView.setAdapter(customAdapter);
    }
}


Step 4:
Copy and paste below flag images into "drawable" folder

ic_austrailia

ic_brazil

ic_canada

ic_denmark

ic_egypt

ic_france

ic_germany

ic_hong_kong

ic_india

ic_japan


You can download this project from below link : 

https://drive.google.com/file/d/0By1zg6cvLTQ9S1NaRHppYzZPVzQ/view?usp=sharing

Thursday, May 28, 2015

ListView Android Example

                    ListView Example Output :

ListView
Project Structure : 
Step 1 :
Activity_main.xml

<LinearLayout xmlns:android="http://schemas.android.com/apk/res/android"
    android:layout_width="match_parent"
    android:layout_height="match_parent"
    android:background="#FFFFFF"
    android:gravity="center"
    android:orientation="vertical"
>

    <TextView
        android:layout_width="wrap_content"
        android:layout_height="wrap_content"
        android:layout_margin="10sp"
        android:text="Country List"
        android:textAppearance="@android:style/TextAppearance.DeviceDefault.Large"
        android:textColor="#ff305aff"
        android:textStyle="bold"
/>

    <LinearLayout
        android:layout_width="fill_parent"
        android:layout_height="match_parent"
        android:background="#FFFFFF"
        android:orientation="vertical"
>

        <ListView
            android:id="@+id/listView"
            android:layout_width="fill_parent"
            android:layout_height="wrap_content"
            android:gravity="center"
            android:divider="#ff305aff"
            android:dividerHeight="1dp"
/>
    </LinearLayout>
</LinearLayout>
Step 2:
MainActivity.java
 
package com.pratik.listviewexample;

import android.support.v7.app.ActionBarActivity;
import android.os.Bundle;
import android.view.View;
import android.widget.AdapterView;
import android.widget.ArrayAdapter;
import android.widget.ListView;
import android.widget.Toast;

import java.util.ArrayList;


   public class MainActivity extends ActionBarActivity {

    private ListView listView;
    private ArrayList<String> arrayList;
    private ArrayAdapter<String> arrayAdapter;

    @Override
    protected void onCreate(Bundle savedInstanceState) {
        super.onCreate(savedInstanceState);
        setContentView(R.layout.activity_main);

        //Initialize listview
       
listView = (ListView) findViewById(R.id.listView);

        //for displaying list items here i used ArrayList and add string
       
arrayList = new ArrayList<>();
        arrayList.add("Australia");
        arrayList.add("Brazil");
        arrayList.add("Canada");
        arrayList.add("Denmark");
        arrayList.add("Egypt");
        arrayList.add("France");
        arrayList.add("Germany");
        arrayList.add("Hong Kong");
        arrayList.add("India");
        arrayList.add("Japan");
arrayAdapter = new ArrayAdapter<String>(this, R.layout.select_dialog_item_material, arrayList);
        //assign adapter to listview
        listView.setAdapter(arrayAdapter);

//here i can set click listener of listview to perform click event in each item of listview

        listView.setOnItemClickListener(new AdapterView.OnItemClickListener() {

            @Override
            public void onItemClick(AdapterView<?> adapterView, View view, int position, long l) {
                //Getting selected Item Value
                String value = (String) listView.getItemAtPosition(position);

                Toast.makeText(MainActivity.this, "You're Selected : " + value, Toast.LENGTH_SHORT).show();
            }
        });
    }
}

Monday, May 25, 2015

Custom Navigation Drawer

Custom Navigation Example Output :


  1. Drawer Output :  

Drawer Output
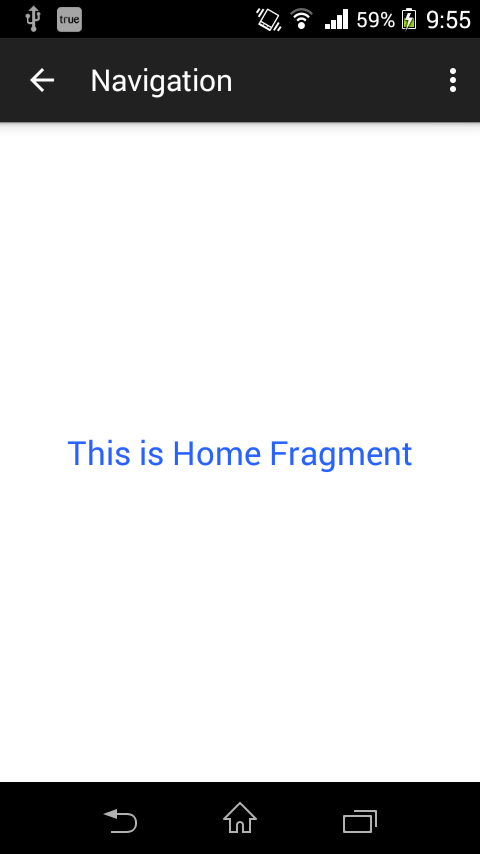
2.  Home Fragment :
3.  Log-In Fragment : 

4.  Profile Fragment :
   
Project Structure : 

Step 1 : Create Project "CustomNavigation Drawer"
Create New Project => Name of project is "CustomNavigationDrawer" => Select Navigation Drawer Activity => Finish
Select Navigation Drawer Activity
Step 2 : 
activity_main.xml

Note : Delete Fragment NavigationDrawer class 

Then Copy Below xml code and paste in activity_main.xml

<!-- A DrawerLayout is intended to be used as the top-level content view using match_parent for both width and height to consume the full space available. -->

<android.support.v4.widget.DrawerLayout xmlns:android="http://schemas.android.com/apk/res/android"
    xmlns:tools="http://schemas.android.com/tools"
    android:id="@+id/drawer_layout"
    android:layout_width="match_parent"
    android:layout_height="match_parent"
    tools:context=".MainActivity">

    <FrameLayout
        android:id="@+id/mainContent"
        android:layout_width="match_parent"
        android:layout_height="match_parent"
        android:background="#ffffff" />

    <RelativeLayout
        android:id="@+id/drawerPanel"
        android:layout_width="280dp"
        android:layout_height="match_parent"
        android:layout_gravity="start">

        <RelativeLayout
            android:id="@+id/profileBox"
            android:layout_width="match_parent"
            android:layout_height="100dp"
            android:background="#ff2761ff"
            android:gravity="center"
            android:padding="8dp"
            android:visibility="visible">

            <TextView
                android:layout_width="fill_parent"
                android:layout_height="wrap_content"
                android:gravity="center"
                android:text="Pratik Surela"
                android:textColor="#FFFFFF"
                android:textSize="30dp"
                android:textStyle="bold" />
        </RelativeLayout>

        <ListView
            android:id="@+id/navigationList"
            android:layout_width="280dp"
            android:layout_height="match_parent"
            android:layout_below="@+id/profileBox"
            android:background="#FFFFFF"
            android:choiceMode="singleChoice"
            android:divider="#3D4C53"
            android:dividerHeight="2dp" />
    </RelativeLayout>
</android.support.v4.widget.DrawerLayout>

Step 3 : 
Update fragment_navigation_drawer.xml

Copy Below xml code and paste in fragment_navigation_drawer.xml

<?xml version="1.0" encoding="utf-8"?>
<RelativeLayout xmlns:android="http://schemas.android.com/apk/res/android"
    android:layout_width="match_parent"
    android:layout_height="match_parent"
    android:paddingBottom="10dp"
    android:paddingTop="10dp">

    <ImageView
        android:id="@+id/icon"
        android:layout_width="40dp"
        android:layout_height="40dp"
        android:layout_alignParentLeft="true"
        android:layout_alignParentStart="true"
        android:layout_marginLeft="10dp"
        android:layout_marginRight="20dp"
        android:layout_marginTop="5dp"
        android:src="@drawable/abc_ic_clear_mtrl_alpha" />

    <TextView
        android:id="@+id/title"
        android:layout_width="wrap_content"
        android:layout_height="wrap_content"
        android:layout_alignParentTop="true"
        android:layout_marginTop="10dp"
        android:layout_toEndOf="@+id/icon"
        android:layout_toRightOf="@+id/icon"
        android:gravity="center_vertical"
        android:text="Line 1"
        android:textColor="#000"
        android:textSize="18sp"
        android:textStyle="bold" />
</RelativeLayout>

Step 4 :
Create Class : NavigationItems.class

package com.pratik.customnavigationdrawer;

/**
 * Created by prats on 5/25/2015.
 */
public class NavigationItems {
    String mTitle;
    String mSubtitle;
    int mIcon;

    public NavigationItems(String title, int icon) {
        mTitle = title;
        mIcon = icon;
    }
}

Step 5 :
Create Custom Adapter : DrawerListAdapter.class

package com.pratik.customnavigationdrawer;

import android.content.Context;
import android.view.LayoutInflater;
import android.view.View;
import android.view.ViewGroup;
import android.widget.BaseAdapter;
import android.widget.ImageView;
import android.widget.TextView;

import java.util.ArrayList;

/**
 * Created by prats on 5/25/2015.
 */
public class DrawerListAdapter extends BaseAdapter {

    Context mContext;
    ArrayList<NavigationItems> mNavItems;

    public DrawerListAdapter(Context context, ArrayList<NavigationItems> navItems) {
        mContext = context;
        mNavItems = navItems;
    }

    @Override
    public int getCount() {
        return mNavItems.size();
    }

    @Override
    public Object getItem(int position) {
        return mNavItems.get(position);
    }

    @Override
    public long getItemId(int i) {
        return 0;
    }

    @Override
    public View getView(int position, View convertView, ViewGroup parent) {
        View view;
        if (convertView == null) {
            LayoutInflater inflater = (LayoutInflater) mContext.getSystemService(Context.LAYOUT_INFLATER_SERVICE);
            view = inflater.inflate(R.layout.fragment_navigation_drawer, null);
        } else {

            view = convertView;
        }
        TextView titleView = (TextView) view.findViewById(R.id.title);
        ImageView iconView = (ImageView) view.findViewById(R.id.icon);
        titleView.setText(mNavItems.get(position).mTitle);
        iconView.setImageResource(mNavItems.get(position).mIcon);
        return view;
    }
}

Step 6 :
Update MainActivity.class file

package com.pratik.customnavigationdrawer;

import android.app.FragmentTransaction;
import android.content.res.Configuration;
import android.support.v4.widget.DrawerLayout;
import android.support.v7.app.ActionBarActivity;
import android.os.Bundle;
import android.support.v4.app.ActionBarDrawerToggle;
import android.view.Menu;
import android.view.MenuItem;
import android.view.View;
import android.widget.AdapterView;
import android.widget.ListView;
import android.widget.RelativeLayout;
import android.widget.Toast;

import com.pratik.customnavigationdrawer.fragments.HomeFragment;
import com.pratik.customnavigationdrawer.fragments.LoginFragment;
import com.pratik.customnavigationdrawer.fragments.ProfileFragment;

import java.util.ArrayList;

public class MainActivity extends ActionBarActivity {

    private ArrayList<NavigationItems> navigationItemsArrayList = new ArrayList<NavigationItems>();
    private DrawerLayout drawerLayout;
    private RelativeLayout drawerPanel;
    private ListView navigationList;
    private ActionBarDrawerToggle mDrawerToggle;
    private FragmentTransaction transaction;
    private String mActivityTitle;

    @Override
    protected void onCreate(Bundle savedInstanceState) {
        super.onCreate(savedInstanceState);
        setContentView(R.layout.activity_main);

        navigationItemsArrayList.add(new NavigationItems("Home", R.drawable.ic_action_home));
        navigationItemsArrayList.add(new NavigationItems("Login", R.drawable.ic_action_login));
        navigationItemsArrayList.add(new NavigationItems("Profile", R.drawable.ic_action_profile));

        mActivityTitle = getTitle().toString();
        // DrawerLayout
        drawerLayout = (DrawerLayout) findViewById(R.id.drawer_layout);
        // Populate the Navigtion Drawer with options
        drawerPanel = (RelativeLayout) findViewById(R.id.drawerPanel);

        navigationList = (ListView) findViewById(R.id.navigationList);
        DrawerListAdapter adapter = new DrawerListAdapter(this, navigationItemsArrayList);
        navigationList.setAdapter(adapter);

        HomeFragment fragment = new HomeFragment();
        android.app.FragmentManager fragmentManager = getFragmentManager();
        fragmentManager.beginTransaction().replace(R.id.mainContent, fragment).commit();

        // Drawer Item click listeners
        navigationList.setOnItemClickListener(new AdapterView.OnItemClickListener() {
            @Override
            public void onItemClick(AdapterView<?> parent, View view, int position, long id
            ) {
                onSectionAttached(position);
            }
        });
        navigationList.setItemChecked(0, true);

        mDrawerToggle = new ActionBarDrawerToggle(this, drawerLayout,
                R.drawable.ic_action_drawer, R.string.navigation_drawer_open,
                R.string.navigation_drawer_close) {

            public void onDrawerClosed(View view) {
                super.onDrawerClosed(view);
                getSupportActionBar().setTitle(mActivityTitle);
                invalidateOptionsMenu(); // creates call to onPrepareOptionsMenu()
            }

            public void onDrawerOpened(View drawerView) {
                super.onDrawerOpened(drawerView);
                getSupportActionBar().setTitle("Navigation!");
                invalidateOptionsMenu(); // creates call to onPrepareOptionsMenu()            }
            }

        };
        getSupportActionBar().setDisplayHomeAsUpEnabled(true);
        getSupportActionBar().setHomeButtonEnabled(true);
    }

    public void onSectionAttached(int number) {
        switch (number) {
            case 0:
                Toast.makeText(this, "Home", Toast.LENGTH_SHORT).show();

                HomeFragment homeFragment = new HomeFragment();
                transaction = getFragmentManager().beginTransaction();
                transaction.replace(R.id.mainContent, homeFragment).commit();
                break;
            case 1:
                Toast.makeText(this, "Log In", Toast.LENGTH_SHORT).show();

                LoginFragment loginFragment = new LoginFragment();
                transaction = getFragmentManager().beginTransaction();
                transaction.replace(R.id.mainContent, loginFragment).commit();
                break;
            case 2:
                Toast.makeText(this, "Profile", Toast.LENGTH_SHORT).show();

                ProfileFragment profileFragment = new ProfileFragment();
                FragmentTransaction transaction = getFragmentManager().beginTransaction();
                transaction.replace(R.id.mainContent, profileFragment).commit();
                break;
        }
        drawerLayout.closeDrawer(drawerPanel);
    }

    @Override
    protected void onPostCreate(Bundle savedInstanceState) {
        super.onPostCreate(savedInstanceState);
        mDrawerToggle.syncState();
    }

    @Override
    public void onConfigurationChanged(Configuration newConfig) {
        super.onConfigurationChanged(newConfig);
        mDrawerToggle.onConfigurationChanged(newConfig);
    }

    @Override
    public boolean onCreateOptionsMenu(Menu menu) {
        getMenuInflater().inflate(R.menu.main, menu);
        return true;
    }

    @Override
    public boolean onOptionsItemSelected(MenuItem item) {
        if (mDrawerToggle.onOptionsItemSelected(item)) {
            return true;
        }
        int id = item.getItemId();

        //noinspection SimplifiableIfStatement
        if (id == R.id.action_settings) {
            return true;
        }

        return super.onOptionsItemSelected(item);
    }
}

Step 7 :
Create Package : "fragment" in this package create 3 class : "HomeFragment","LoginFragment","ProfileFragment"

HomeFragment.class : 

package com.pratik.customnavigationdrawer.fragments;

import android.app.Fragment;
import android.content.Context;
import android.os.Bundle;
import android.view.LayoutInflater;
import android.view.View;
import android.view.ViewGroup;

import com.pratik.customnavigationdrawer.R;

/**
 * Created by prats on 5/25/2015.
 */
public class HomeFragment extends Fragment {

    private Context context;
    @Override
    public View onCreateView(LayoutInflater inflater, final ViewGroup container, Bundle savedInstanceState) {
        // Inflate the layout for this fragment
        context = container.getContext();
        View rootView = inflater.inflate(R.layout.fragment_home, container, false);
        return rootView;
    }
}

LoginFragment.class : 

package com.pratik.customnavigationdrawer.fragments;

import android.app.Fragment;
import android.content.Context;
import android.os.Bundle;
import android.view.LayoutInflater;
import android.view.View;
import android.view.ViewGroup;

import com.pratik.customnavigationdrawer.R;

/**
 * Created by prats on 5/25/2015.
 */
public class LoginFragment extends Fragment {

    private Context context;
    @Override
    public View onCreateView(LayoutInflater inflater, final ViewGroup container, Bundle savedInstanceState) {
        // Inflate the layout for this fragment
        context = container.getContext();
        View rootView = inflater.inflate(R.layout.fragment_login, container, false);
        return rootView;
    }
}

ProfileFragment.class : 

package com.pratik.customnavigationdrawer.fragments;

import android.app.Fragment;
import android.content.Context;
import android.os.Bundle;
import android.view.LayoutInflater;
import android.view.View;
import android.view.ViewGroup;

import com.pratik.customnavigationdrawer.R;

/**
 * Created by prats on 5/25/2015.
 */
public class ProfileFragment extends Fragment {

    private Context context;
    @Override
    public View onCreateView(LayoutInflater inflater, final ViewGroup container, Bundle savedInstanceState) {
        // Inflate the layout for this fragment
        context = container.getContext();
        View rootView = inflater.inflate(R.layout.fragment_profile, container, false);
        return rootView;
    }
}

Step 8 :
Create 3 Layout xml file :
"fragment_home","fragment_login","fragment_profile"

fragment_home.xml : 

<?xml version="1.0" encoding="utf-8"?>
<LinearLayout xmlns:android="http://schemas.android.com/apk/res/android"
    android:layout_width="match_parent"
    android:layout_height="match_parent"
    android:orientation="vertical"
    android:gravity="center">

    <TextView
        android:layout_width="wrap_content"
        android:layout_height="wrap_content"
        android:text="This is Home Fragment"
        android:textColor="#ff2761ff"
        android:textAppearance="@android:style/TextAppearance.DeviceDefault.Large"/>
</LinearLayout>

fragment_login.xml :

<?xml version="1.0" encoding="utf-8"?>
<LinearLayout xmlns:android="http://schemas.android.com/apk/res/android"
    android:layout_width="match_parent"
    android:layout_height="match_parent"
    android:orientation="vertical"
    android:gravity="center">

    <TextView
        android:layout_width="wrap_content"
        android:layout_height="wrap_content"
        android:text="This is Log-In Fragment"
        android:textColor="#ff2761ff"
        android:textAppearance="@android:style/TextAppearance.DeviceDefault.Large"/>
</LinearLayout>

fragment_profile.xml :


<?xml version="1.0" encoding="utf-8"?>
<LinearLayout xmlns:android="http://schemas.android.com/apk/res/android"
    android:layout_width="match_parent"
    android:layout_height="match_parent"
    android:orientation="vertical"
    android:gravity="center">

    <TextView
        android:layout_width="wrap_content"
        android:layout_height="wrap_content"
        android:text="This is Profile Fragment"
        android:textColor="#ff2761ff"
        android:textAppearance="@android:style/TextAppearance.DeviceDefault.Large"/>
</LinearLayout>

Step 9 :
Update string.xml file : 

<resources>
    <string name="app_name">Navigation</string>

    <string name="navigation_drawer_open">Open navigation drawer</string>
    <string name="navigation_drawer_close">Close navigation drawer</string>
    <string name="action_settings">Settings</string>
</resources>

Step 10 :
Put this 3 logos into "drawable" folder : 
ic_action_home

ic_action_login

ic_action_profile
Step 11 :

Run the app and Enjoy.......

Download This Project from below link: 

https://drive.google.com/file/d/0By1zg6cvLTQ9bHMwLUd3cTg2QjA/view?pli=1